Sidewinder Canyon – Death Valley National Park


H ike up a desert canyon to explore multiple slot canyons.
| Total Distance: 4.6 miles out & back or up to 8.1 miles out & back with spurs | Elevation Gain: 1,651ft. or up to 3,646ft. (-234ft. to 1,113ft.) |
| Difficulty: Moderately Strenuous or up to Very Strenuous | 0-5 Mile Difficulty: Very Strenuous or up to Extremely Strenuous |
| View Rating: 4.0 out of 5.0 stars | Author’s Rating: 5.0 out of 5.0 stars |
| Visitor Rating: (Click to rate) [Total: 1 Average: 1] | Visitor Difficulty Rating: (Click to rate) [Total: 1 Average: 1] |
| Pets: No | Horses: No |
| Best Seasons: November-April | Special Permits: None |
| Water Availability: None | Overnight Options: Dispersed camping permitted after about 1.25 miles (1 mile from the Badwater Road) |
| Trailhead Amenities: None | Crowd Factor: Moderate to Crowded |
| Trailhead Access: 1.3 | |
| Uses: | Trail Surface:  |
| Features: | Hazards: |
Mile-by-Mile: Sidewinder Canyon Route
Note: Distances do not include exploring the side slot canyons. I’ve included the distances up the side canyons, but your distance may vary dependent on your desire to scramble dryfalls and time constraints. Mileages in parenthesis () are the cumulative distance for all slots.
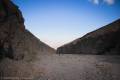
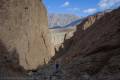
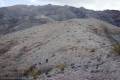
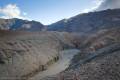
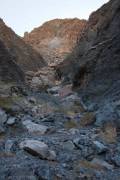
0.0 Sidewinder Canyon Trailhead (-234ft.). Follow the trail generally south and then east up Sidewinder Canyon. (Be careful to get the trail heading south (so the Badwater Road is on your right) – the trail heading north is the one for Willow Canyon.) The path is crossing the outlet of the wash, so it’s mostly loose gravel. After about a half a mile, the route turns east into Sidewinder Canyon. (36.0650500°, -116.7450000°)
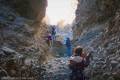
0.65 Slot 1 (108ft.). The first slot (known as Slot -2 or not mentioned in other publications) is a break in the east (left) canyon wall marked by boulders in the wash on the left. This is the only slot on the hike on the east side of the main Sidewinder Canyon. It can be explored for approximately 0.2 miles east and south to a dryfall. After desired exploration, continue up Sidewinder Canyon. (36.056974°, -116.743526°) Add 0.4 miles for exploring Slot 1.
0.7 (1.05) Slot 2 (111ft.). Turn right to the slot (also known as Slot -1 or often not mentioned in hiking guides). It’s not long or terribly exciting, but it’s still fun to explore. Return to the main Sidewinder Canyon and continue upcanyon. (36.0564833°, -116.7436000°) Add 0.3 miles for exploring Slot 2.
0.8 (1.45) Slot 3 (176ft.). Turn right into the slot (also known as Slot 0 or not mentioned in many guides). There are a few dryfalls to scramble (Class 3) as the slot winds 0.15 miles up into the hills. (When the slot very nearly reaches the top of the canyon, you can climb up the left (south) wall to scramble up on the hill for views down on Sidewinder Canyon and Death Valley.) Retrace your steps back to the main Sidewinder Canyon and continue upcanyon. (36.0552833°, -116.7424500°) Add 0.3 miles for exploring Slot 3.
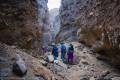
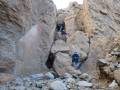
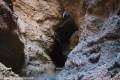
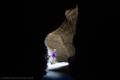
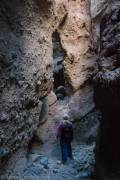
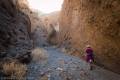
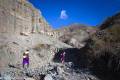
1.0 (1.85) Slot 4 (259ft.). This is the first of the exciting slots (and it’s often called Slot 1 in hiking guides). Turn right to walk up into the side canyon; fairly quickly, the canyon splits right and left. There is little that’s exciting to the right, but it can be explored for 0.05 miles, if desired, up to a slanting dryfall. To the left, the route is blocked by a set of large chokestones. These are fairly easily negotiated by crawling under the stones on the left side. The passage is often dark (a flashlight is helpful but not required) and finally ends 0.3 miles from the canyon split in a very dark, small cathedral that feels a bit like a cave. Retrace your steps to the main Sidewinder Canyon and continue upcanyon. As you approach the place where the main Sidewinder Canyon obviously narrows, Slot 5 will become visible on the right. (36.053617°, -116.740640°) Add 0.8 miles to explore Slot 4.
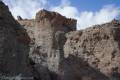
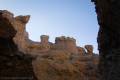
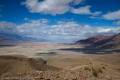
1.1 (2.75) Slot 5 (313ft.). Slot 5 (usually called Slot 2) is another of the exciting slot canyons. After twisting upward for about 0.15 miles (approx. 36.051179, -116.737989), an arch appears to block the way upward. Actually, you can climb into the arch by following the social trail right, or you can bypass the arch by turning left. A few dryfalls (Class 3) slow progress beyond the arch; near the head of the canyon (0.4 miles from the mouth), the entire slot turns into a dryfall. Be sure to look up in this section for rock pinnacle formations on the wall of the canyon. (The head of the canyon can be scrambled (Class 3) with care, and a social trail accessed above the head of the canyon. Turning left on this social trail up to the top of the hill gives excellent views of Sidewinder Canyon, Telescope Peak, and Death Valley.) Return to the mouth of Slot 5 and continue upcanyon as the walls around the main Sidewinder Canyon close in for some nice narrows. There are several small cracks on the right (south) wall of the canyon before Slot 6. (36.052769°, -116.738950°) Add 0.8 miles for exploring Slot 5.
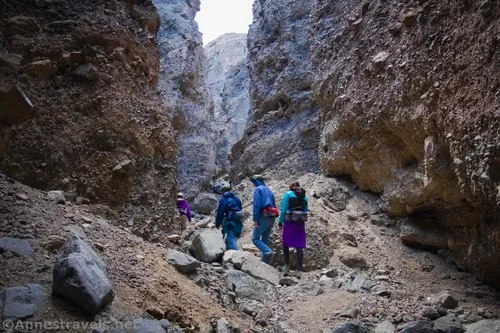
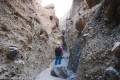
1.3 (3.9) Slot 6 (457ft.). Turn right to explore the slot (often called Slot 3 by hiking guides). There are two natural bridges near the beginning of the canyon, and the canyon walls tower, with several difficult obstacles (Class 3). The slot extends about 0.5 miles. Once you reach your desired turn around point, return to the main Sidewinder Canyon. Most people return to the parking area at this point. However, this guide continues up the main Sidewinder Canyon. The walls are generally close, though the true “slot” ends shortly after Slot 6, with a few fairly easy dryfalls to navigate (Class 2 or mild Class 3). A short distance before the end, the walls narrow significantly before opening back up. (36.051628°, -116.734867°) Add 1.0 mile for exploring Slot 6.
2.3 (5.9) Dryfall (1,140ft.). A steep pile of rocks creates an impassible dryfall that blocks forward progress. Nearby a slot (rarely explored) veers off on the left. Return down Sidewinder Canyon back down to the trailhead. (36.0449833°, -116.7248667°)
4.6 (8.1) Sidewinder Canyon Trailhead (-234ft.). (36.0650500°, -116.7450000°)
History & More
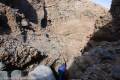
The rock in Sidewinder Canyon is mostly loose and crumbly (conglomerate rock), at least for the first 2 miles or so. This makes scrambling a bit more complicated. Watch your footing, wear good shoes, and don’t try anything you’re not comfortable with.
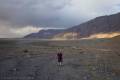
Sidewinder Canyon was a true family favorite when we visited. The slot canyons were just way too fun, and there were enough views, arches, rock formations, etc., to keep the older ones entertained.
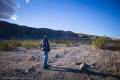
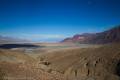
At the beginning of the hike, you’re hiking a formation called an Alluvial Fan. This is the debris that has been washed down the canyon by flash floods in past years. It’s interesting to see the wide variety of rocks that get washed out of the Black Mountains.
Don’t forget to bring a flashlight or phone flashlight for exploring the darkest of the slots!
Download Trail Map
Driving Directions
From the Furnace Creek Visitor Center, drive south on CA-190E (a right turn if you’re coming out of the visitor center access road). After 1.3 miles, turn right onto the Badwater Road, following signs for Badwater. Drive 31.3 miles; a sign will indicate the Sidewinder Trailhead on the left (east). You want to park on the right (south) side of the parking area.
From Death Valley Junction, take CA-190 West 28.9 miles to the Badwater Road; turn left toward Badwater. After 31.3 miles; a sign will indicate the Sidewinder Trailhead on the left (east). You want to park on the right (south) side of the parking area.
From CA-127 north of Shoshone, turn onto the Jubilee Pass Road. Drive 24.9 miles, then take the paved road as it turns sharply north at the junction for the Harry Wade Road. Drive for another 14.5 miles on the Badwater Road to the Sidewinder Trailhead, on the right (east). You want to park on the right (south) side of the parking area. Note that there’s no sign from this side, but it’s quite soon after passing Mormon Point, which is signed.
The parking area is gravel, but it should be passable by low-clearance vehicles under most circumstances.
Camping in a canyon is discouraged due to the danger of flash floods.
Remember, it may be easier to climb up dryfalls than down them (or vice versa). Be sure you can climb in the other direction before climbing up or down a dryfall.
Camping is not allowed within one mile of a paved road, developed area, or dirt road that is closed to camping.
Camping is not permitted within 100 feet of a flowing stream, spring, or other natural body of open water.
No camping is permitted on the floor of Death Valley, within one mile of Darwin Falls and Greenwater Canyon, on the active/shifting sand dunes, and certain other canyons and backcountry areas.
Camping is also prohibited within one mile of the Ubehebe Lead Mine, Leadfield Mines, Keane Wonder Mill, and Skidoo Mill.
Camping is limited to 30 days per calendar year within the park.
Fires are permitted in NPS-provided fire grates or grills ONLY.
Leave No Trace Principles are enforced
Drones and model aircrafts are prohibited
Camping is permitted only in designated sites or in areas open to dispersed backcountry camping
All park rules and regulations
12 Month Pass: $55/Death Valley Annual Pass (valid at Death Valley National Park). $80/America the Beautiful Annual Pass (valid at all national park and federal fee areas). $20/Annual Senior Pass (62 years or older US citizens; valid at all national park and federal fee areas). Free/4th Grade Pass (Valid Sept. 1-August 31 of the child’s 4th Grade school year). Free/Military Pass (valid for all active military personel and their dependents with a CAC Card or DD Form 1173).
Lifetime Pass: $80/Lifetime Senior Pass (62 years or older US citizens; valid at all national park and federal fee areas). Free/Access Pass (available to all US citizens with perminent disabilities). Free/Access for Veterans and Gold Star Families Pass (valid for all military and veterans with a CAC card, Veteran HJealth Identification Card, Veteran ID Card, or veteran’s designation on state-issued drivers license or identification card.)
4 thoughts on “Sidewinder Canyon – Death Valley National Park”